Chickery's Travels

Chickery's Travels logo. A blue-green Earth globe with continents surrounded by dots with an arrow denoting movement or travel and "Chickery's Travels" as part of the dotted circle. Next to this is a photo of their blue and white Arctic Fox 5th Wheel with the awning out.
  • Home
  • Campground Reviews
    • The Best U.S. National Park Campgrounds
    • 28 Must-See State Park Campgrounds You Can’t Miss
    • Alternatives To National Park Campgrounds: Discover Hidden Gems Just Outside the Park Boundaries
    • Best Luxury RV Resorts For All RV Types
    • Best Waterfront Campgrounds For Every Budget
    • Alabama
      • Gunter Hill Campground (Montgomery, Alabama)
    • Arizona
      • Best Campgrounds in Arizona
      • Aspen Campground (Payson, Arizona)
      • LazyDays KOA (Tucson, Arizona)
      • Lost Dutchman State Park (Phoenix, AZ)
    • Arkansas
      • Catherine’s Landing (Hot Springs, Arkansas)
      • Downtown Riverside RV Park (Little Rock, Arkansas)
    • California
      • Best Campgrounds in California
      • Crescent City Redwoods KOA (Crescent City, California)
      • Sea Breeze RV Park (Seal Beach Naval Weapons Station)
    • Delaware
      • Cape Henlopen State Park (Lewes, Delaware)
    • Florida
      • Best Campgrounds in Florida
      • Blue Angel Naval Recreation Area (Pensacola, FL)
      • Jonathan Dickinson State Park (Southeast FL)
      • LazyDays RV Resort (Tampa, FL)
      • MacDill AFB FamCamp (Tampa, FL)
      • Military Camping in Key West
      • Patrick AFB FamCamp (Cocoa Beach, FL)
      • Rainbow Springs State Park & Campground (Ocala, FL)
      • Walt Disney World’s Fort Wilderness (Orlando, FL)
        • Halloween at Disney’s Fort Wilderness
        • Chickery’s Travels Podcast Episode 5: Fort Wilderness Campground Review
    • Maryland
      • Cherry Hill Park (College Park, Maryland)
    • Michigan
      • Port Huron KOA (Kimball, Michigan)
    • Nevada
      • Best Campgrounds in Nevada
      • Las Vegas RV Campgrounds: Nellis Air Force Base and Lake Mead RV Village
      • Boondocking Near Las Vegas
    • New Hampshire
      • Lincoln / Woodstock KOA (New Hampshire)
    • New York
      • Round Pond Recreation Area (West Point, NY)
    • North Carolina
      • Outer Banks West / Currituck Sound KOA (Coinjock, North Carolina)
    • Oklahoma
      • Oklahoma City East KOA (Choctaw, Oklahoma)
    • Texas
      • Best Campgrounds in Texas
      • Alsatian RV Resort (Castroville, Texas)
      • Maverick Ranch (Lajitas, Texas)
      • Texas Wine Country Jellystone (Fredericksburg, Texas)
    • Tennessee
      • Camp Margaritaville (Pigeon Forge, TN)
      • Crossville I-40 KOA (Crossville, TN)
      • Midway RV Park (Memphis, TN)
    • Virginia
      • Complete Guide to Camping at Shenandoah National Park
      • Cape Charles / Chesapeake Bay KOA (Cape Charles, Virginia)
      • Fort Belvoir Travel Camp (Alexandria, VA)
      • Harrisonburg / Shenandoah Valley KOA (Broadway, Virginia)
      • Shenandoah Views Campground (Luray, Virginia)
      • Lynchburg / Blue Ridge Parkway KOA (Monroe, Virginia)
      • Shenandoah River State Park (Bentonville, Virginia)
    • Washington
      • Crescent Bar RV Resort (Quincy, Washington)
    • West Virginia
      • Harper’s Ferry KOA (Harper’s Ferry, West Virginia)
  • USA
    • Alaska
      • 5 Things You Can’t Miss On Your First Trip To Alaska
    • Arizona
      • Apache Trail: A Crazy, Scary, Beautiful Drive
      • Best of Tucson – 10 Unforgettable Activities
      • Complete Guide to Saguaro National Park
      • Lost Dutchman State Park (Phoenix, Arizona)
      • Phoenix Faves: Best Activities to Enjoy on Your Arizona Vacation
    • California
      • Complete Guide to Joshua Tree National Park
      • Complete Guide to Redwood National and State Parks
    • District of Columbia
      • Budget Friendly Fun in Washington D.C.
      • Favorite Hikes near Washington DC
      • Indoor Skydiving and TopGolf: Just Another Day of Family Fun!
    • Florida
      • Florida National Parks Road Trip Guide
      • Best Beaches in Florida’s Panhandle
      • Best Walt Disney World Festivals For Adults
      • Blowing Rocks Preserve – Jupiter Island, Florida
      • Bok Tower Gardens
      • Daytona Beach – The World’s Most Famous Beach
      • Enjoy the Best of Sunny Sarasota
      • Epcot International Food & Wine Festival
      • Gasparilla – Tampa’s Pirate Invasion
      • 3 Days on the Nature Coast 
      • Get Back to Nature in Tampa Bay
      • Florida Freshwater Springs on the Nature Coast
      • Halloween at Disney’s Fort Wilderness
      • Kennedy Space Center – Cape Canaveral
      • Island Hopping at Honeymoon Island and Caladesi Island State Parks
      • Must See Sights in St. Augustine, FL – America’s Oldest City
      • Rainbow Springs State Park & Campground (Dunnellon, Florida)
      • Take Me Out to the Ball Game – Spring Training in Tampa, FL
      • Tarpon Springs – The Gulf Coast Town with Greek Flavor
      • The 5 Best Beaches in the Tampa Bay Area
      • Top 5 Things to Do on Florida’s Space Coast
      • What Not to Do When Kayaking on the Weeki Wachee River
      • Why We Love Tampa
      • Wizarding World of Harry Potter – Universal Studios and Islands of Adventure
    • Georgia
      • Visiting Atlanta? Don’t Miss These Civil Rights Museums
    • Hawaii
      • Everything You Need to Know About Camping in a Jeep Wrangler in Hawaii
    • Illinois
      • One Day In The Windy City – Chicago Itinerary
    • Maine
      • Coastal Maine Road Trip
      • Discover the Beauty of Monhegan Island, Maine
      • Acadia National Park: Highlights You Can’t Miss
    • Nevada
      • Explore Las Vegas – It’s More Than Just Gambling
    • New Hampshire
      • Experience the Magic of New Hampshire’s White Mountains
    • North Carolina
      • Complete Guide to Great Smoky Mountains National Park
      • Uncover the Coastal Charm of North Carolina’s Outer Banks | A Guide for Visitors
    • Oregon
      • Navigating Oregon’s Natural Gems
    • Pennsylvania
      • The Best Things To Do In Lancaster Pennsylvania
    • Tennessee
      • Complete Guide to Great Smoky Mountains National Park
      • Burgess Falls: 3 For 1 Waterfall Special
      • National Civil Rights Museum – Memphis, TN
      • Window Cliffs, TN – I’m Not Afraid of Heights, But I am Afraid of Falling!
      • WWII History in Tennessee
    • Texas
      • Best Restaurants in Fredericksburg
      • Enjoy a Bird’s Eye View of Texas Hill Country
      • Explore Nature’s Untamed Beauty at Big Bend National Park
      • Top 10 Activities in the Dallas – Fort Worth
    • Utah
      • Discover the Best of Zion National Park
    • Virginia
      • Explore Great Falls Park, Virginia
  • RV Resources
    • 3 Simple Steps to Find the Best RV Campgrounds
    • 5 Years Full-Time RV: Lessons Learned & Biggest Regret
    • Boondocking – What We Learned From Our First Dry Camping Experience
    • Tips for Boondocking Success
    • Essential RV Gear
      • Essential RV Gear Guide
      • DIY RV Power & Solar Upgrade
      • RV Must Have: Tire Pressure Monitoring System
      • RV SnapPads Product Review
      • RVLOCK Keyless Entry Door Handle Installation and Review
      • Shop “RV Local” With TechnoRV
      • Top RV Gadgets & Accessories
      • WeBoost Cellular Booster Review
    • Maintenance
      • DIY RV Power & Solar Upgrade
      • DIY Power Upgrade – “Solar Ready” Arctic Fox Fifth Wheel
      • An Easy Way to Protect Your RV Water Heater
      • Easy DIY Project to Protect Your RV Water System
      • How to Reduce the Likelihood of Tire Blowouts on your RV
      • Odor Free RV Black Tank Tips
      • RV Condensation: What It Is, What It Does, and How To Stop It
      • RV Roofs – What You Need to Know
    • Living in an RV
      • 9 Lessons From 2 1/2 Years on the Road
      • Dealing with my Biggest Full-Time Travel Struggle, Missing Family While Traveling
      • Downsizing: 3 Areas That Make The Biggest Impact
      • Full-Time RV: 2019 Year in Review
      • Full-Time RV: 2018 Year in Review
      • Full-Time RV Travel – 2017 Year In Review
      • How Full-Time RVers Celebrate the Holidays
      • Get Ready for Full-Time RV Travel
      • Internet Solutions for RV Travelers
      • The Ultimate Guide to Embracing the Full-Time RV Lifestyle
      • Living in a Tiny, Traveling Home
      • Making Friends (and reconnecting with old friends) While Traveling Full-Time
      • Pros & Cons of Full-Time RV Travel
      • RV Organization & Storage Ideas
      • Short-Term RV Storage: Leaving The RV Behind
      • Top 3 Lessons Learned & Biggest Regret: 3 Years Full-Time RV Living
      • What We Wish We Knew Before Full-Time RVing – Stories from the Road
      • What You Need To Know Before Selling Everything And Moving To An RV
      • Why We Are Traveling Full-Time In Our RV
    • Must Read Books Before Becoming A Full-time RVer
    • RV Organization & Storage Ideas
    • RV Remodel
      • Planning an RV Remodel
      • RV Kitchen Cooking Videos
      • Painting Your RV Interior
      • Update the RV Kitchen – Backsplashes & More
      • Updating Your RV Window Treatments
      • RV Bedroom Makeover
      • RV Remodel Costs with Before & After Photos
      • Vintage Camper Renovation
    • RV Holiday Tour – Decorating Our Small Space
    • RV Hurricane Evacuation
    • RV Misery Can Be Overcome By The Generosity Of Others
    • How Book Readers Can Space and Weight in the RV
    • Slow Travel
    • Small Kitchen Cooking
      • Eating Healthy on Travel Days
    • Staying Healthy
      • Traveling with Fibromyalgia, Arthritis, and Other Chronic Pain Conditions
    • Trip Planning
    • Traveling with Pets
      • RVing with Your Cat
      • Traveling with Restricted Breed Dogs
    • Why I Prefer RV Travel Over Flying
    • Your Guide To Planning The Best Family Vacation This Summer
  • Travel Finance
    • 5 Tips to Save on RV Travel
    • 5 Ways to Fund Full-Time Travel
    • Creative Ways To Save Money On Your Next Vacation
    • Full-Time RV Expenses
      • Annual Full-Time RV Expenses – The Big Three
    • Five Credit Card Strategies To Improve Travel
    • How Much Do Campgrounds Cost?
    • How Much Does it Cost to RV Full-Time?
    • How to Camp for Free
    • How to Earn Passive Income from Your RV (Without Doing Any Work)
    • How to Save Money on RV Fuel Costs
    • How to Save on Food While Camping
    • How to Start a Profitable Blog
    • How We Earn A Living While Traveling Full-Time (And How You Can Too)
    • How We Paid $139,000 of Debt in 2 Years While Full-Time RVing
    • Learn How to Finance Your Dreams
    • The Top 7 Ways to Save Money While Traveling Full-Time
    • RV Purchasing
      • RV Purchasing: Understanding RV Types
      • Benefits of Renting an RV: Try Before You Buy
      • Should I Buy A New or Used RV?
      • The Costs of RV Ownership
      • The True Cost of Financing an RV
      • Attend An RV Show – Even If You Already Own An RV | Exciting Reasons Why
    • Save Money Using the Public Library (On More Than Just Books)
  • Military Travel
    • Guide To Using Military Campgrounds
    • Health Care for Retired Military Full-Time RVers
    • Why Military Retirees Should Fly Space-A
  • About Us
    • RV Shows We’re Attending
    • Contact Us
    • Follow Us

8:32 am by Julie Chickery

DIY Power Upgrade – “Solar Ready” Arctic Fox Fifth Wheel

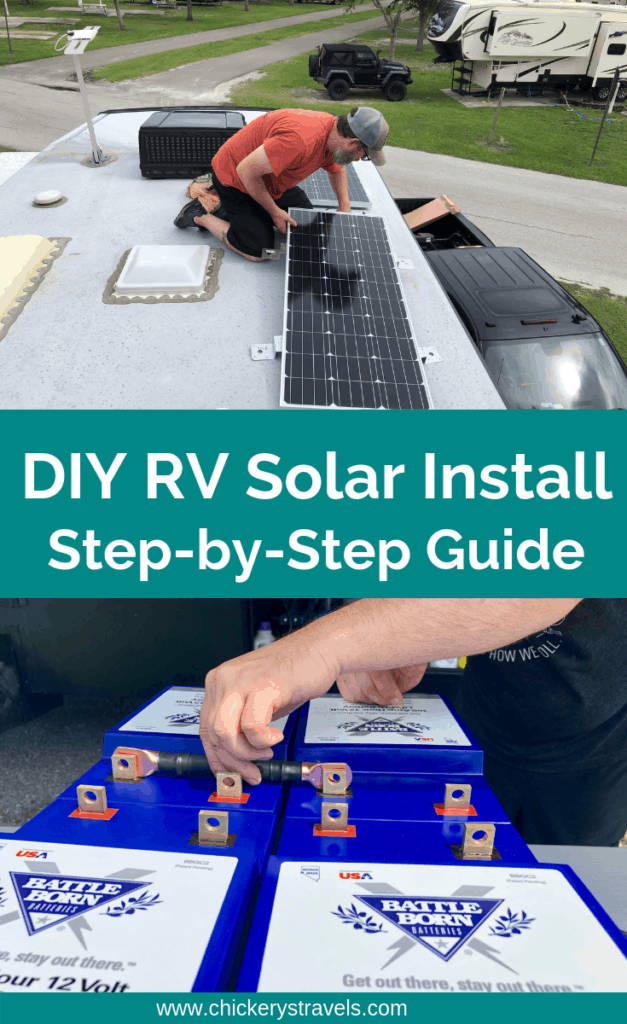
We love our Arctic Fox 27-5L Fifth Wheel! Still, we knew we wanted to upgrade the solar & power setup right away. We’ve been so happy with the DIY solar/power upgrade we made to our previous Fifth Wheel, we wanted to make them to this one too. This included 680 watts of solar, 400Ah lithium battery system, and a 3000W Victron inverter/charger.

Solar Ready? 

We left the solar panels on our previous Fifth Wheel. The Arctic Fox comes “solar-ready” so we though the process was actually going to be easier. For our package this meant it had a single 80-watt solar panel on the roof and a port on the side of the RV to add a portable solar panel. However, the wiring leading to the controller wasn’t sufficient for the additional 680 watts of solar we wanted to add.

For this upgrade, I purchased the following kit: 

  • 4 x 170-Watt Panels
  • 60-Amp, 5-stage PWM charge controller
  • Pre-assembled wiring harness
  • Two, 3-port roof caps (ready for future expansions!)
  • Stainless steel mounting hardware
  • Digital remote LCD display

Watch the following installation video: 

Lithium Batteries

We were able to swap out the standard lead acid batteries at the dealership for our Battle Born Lithium batteries. We choose to go with lithium ion batteries last year because they provide better performance, last longer, and contain no toxic components. Battle Born’s customer service and 10-year warranty stood ahead of the other manufacturers. 

Watch our battery installation video on the previous RV below: 

Inverter

The Arctic Fox did not come with an inverter, but we saved the 1000W inverter during our upgrade and replaced it when trading in the RV. I forgot to record a video of that installation, but here is my inverter installation in our previous Fifth Wheel. 

Costs

As always, we like to be transparent about costs. We’ll admit that it was not an inexpensive project. All of the components, except the solar panels, were purchased from Battle Born Batteries. They sell bundles based on our setup at the 200ah, 400ah, 600ah, or 800ah levels. 

Battle Born lithium battery bundles for RVs

The Zamp solar 680-watt kit (components listed in the Solar Ready paragraph above) was $2,900. 

We spread these costs over two years with the battery/inverter upgrade first. 

Is it worth it?

We had the upgrade on our previous Fifth Wheel for a year before moving to the Arctic Fox, and can definitely say that the battery and inverter upgrade alone was 100% worth it.

We took our RV in for service and did not worry about it sitting in a bay for 6 or 7 hours because we knew the batteries and inverter would keep our refrigerator running. In fact, the batteries did not go below 70% during that time. We would not have been able to do that with our factory-installed batteries and inverter. This is not a knock on the factory equipment, it is just that they are not designed to be compatible with that type of use.

We also started doing some boondocking and dry camping. We spent 9 days off grid in January and only had to run our generator twice for one hour each to top off the batteries when it was a little cloudy.  

Our Arctic Fox had a Norcold 2-way refrigerator that could run off propane or electricity, but we had so many problems with it that we replaced it with an electric-only model. Even with that we can still run an air conditioner off of our batteries.

Sharing is Caring! Feel free to share the image below on Pinterest.

Our solar ready RV only came with a single 80 watt panel and no inverter. Our upgrade included 680 watts of solar, 400Ah lithium battery system, and a 3000W inverter to allow us to dry camp or stay off grid for weeks at a time. This upgrade can be applied to any type of RV, motorhome or fifth wheel.

Filed Under: Essential RV Gear, Maintenance

8:00 am by Julie Chickery

DIY RV Power & Solar Upgrade

Considering upgrading your RV power system? How about adding a little solar? In this article, I’ll share how I was able to successfully upgrade our power system with lithium batteries, a new converter & inverter, as well as a basic solar panel installation. I’ll also list all of the component costs, and my thoughts on the performance of the new system so far.

Table of Contents
  • Why Update?
  • Installation
  • Performance
  • Costs
    • Costs of the Major Components
    • Costs of the Miscellaneous Items
  • Is it worth it?
Graphic will text for Roadtrippers Plus

Why Update?

A few months ago, we were at a location for a project and found ourselves with little to no power for a few weeks. We quickly tired of going to the gas station every single day to get gas for our on-board generator. This prompted some serious research into a completely new electric system including lithium batteries, more powerful inverter/charger, new power converter, and a solar set-up.

After serious searching, we decided to go with Battle Born Batteries as our source for all of our components. As you will see below, we were very impressed with the customer friendliness of Battle Born Batteries as well as the assistance from the RV community. They were helpful from the initial design of our system based on our needs and support through the installation.

Because I’m also trying to learn more about my RV and its systems, I thought a DIY project would be the way to go.

Installation

Electricity is not something I was very familiar with, but I enjoy a challenge and enjoy learning. Although initially intimidating, this ended up not being a difficult project. I took my time and was sure to read the manuals as I went to each component. There also are some RVers out there that are very good at this stuff and are also very helpful. Dan from Always on Liberty, Justin from Opting out of Normal, and Gary from Pau Hana Travels were very helpful and really gave me the confidence to get this started.

In addition the folks at Battle Born Batteries were very responsive to all my questions during the process. Some companies wash their hands of you once the sale is done, but Battle Born Batteries is not like that and were very quick to help when I had a question. Overall, I would rate this as entirely possible for anyone to tackle as a DIY project.

I completed the upgrade in 3 parts:

Part I consisted of replacing our 2 original lead acid batteries with 4 lithium batteries for increased capacity. I also replaced the original converter.

In Part II, I installed a new inverter/charger and battery monitor.

Finally, in Part III I added solar panels and a solar charge controller.

UPDATE: About a year after this post, we purchased a new RV that was “solar ready.” Read here for the upgrade I made to that system. 

Performance

I have nothing but good things to say about the performance of the products so far. I did have to reset the battery monitor after installing the solar because it was stuck on 62% even though the batteries were fully charged. It has worked perfectly ever since. I also had a bad fuse that took some troubleshooting. It ended up being my fault and was not any of the core products, but was a fuse I installed between the solar panels and the charge controller.

As far as testing the system components, I have run the batteries without any additional power and was impressed with the performance. They have no problem maintaining a steady 13.2 volts for many hours. I have used the inverter/charger with the batteries and they charge incredibly fast. I have used only the solar panels, which let me know that I need to at least triple my solar to maintain the batteries with how I use them. 200 watts is not enough juice to keep the batteries charged with our usage. I also used the converter and it performed as expected. After running the system for a few weeks, I really think the entire subject of performance comes down to how well the batteries are designed and perform. They really are the key to a successful system, in my opinion.

Costs

Let’s now talk about the costs. We will admit up front that it was not what we consider an inexpensive project. All of the components, except the solar panels, were purchased from Battle Born Batteries. Although I did not have them do it because I wanted to do a total DIY install, if you purchase the main components from them, they can do all of the programming so it becomes a plug-and-play system and saves some time and costs during the installation.

Costs of the Major Components

ItemCost
Battle Born BB10012’s LiFePO4 Batteries (4)$3,796
3000 Watt Victron Inverter/Charger$1,400
150/85 Victron Smart Solar Charge Controller$   800
Victron BMV712 Battery Monitor$   220
Progressive Dynamics Inc 9180LV Converter$   351
Battery Guard Autoselect$   175
Victron Mk3 to USB to program the inverter$     81
HQST Slim Design 100 Watt Solar Panels (2)*$    218
Major Components Total$7,041

*In our new RV, we went with Zamp solar instead of the panels listed above. Click here to learn more about that project.

Learn how to pay off debt, earn an income, and save money all while traveling full-time.

Costs of the Miscellaneous Items

Besides the major components, there are other things I had to purchase in order to complete the installation.

ItemCost
Renogy Pair of 30Ft 10AWG Solar Cable$   38
Renogy MC4 Assembly/Disassembly Tool$     7
Dewhel Battery Switches Battery Disconnect Isolator$    18
Dicor White Non-Sag Roof Lap Sealant$    12
Pico Battery Cable 3/8″ Lug$    21
Panel Mounting Brackets w/ Nuts & Bolts$   115
Ultra-Flexible Car Battery/Welding Cable-4/0 Ga$     81
Premium Extra Flexible Cable 600V-4 Gauge$     40
Other miscellaneous items$   249
Miscellaneous Items Total   $   520

These items consisted of all of the wiring, screws, nuts, bolts. Basically everything needed to get the components connected and mounted on the RV. Depending on what parts and pieces you have already, this miscellaneous cost may be a little more or a little less.

This brings the Grand Total for the install to right at $7,561. If I add the additional 600 watts of panels that I need to get it where I want it, the total will be around $8,257. This is a large expense by our definition, but there is some scalability as you will read below. This means the overall expense can be broken-up over time as it becomes affordable.

Is it worth it?

I can definitely say that the batteries and inverter upgrades were 100% worth it. We took our RV in for service and did not worry about it sitting in a bay for 6 or 7 hours because we knew the batteries and inverter would keep our refrigerator running. In fact, the batteries did not go below 70% during that time. We would not have been able to do that with our factory installed batteries and inverter. This is not a knock on the factory equipment, it is just that they are not designed to be compatible with that type of use.

I definitely recommend updating the batteries and inverter for peace of mind. I think the solar will end up being extremely beneficial for us when we make stops in areas without hook-ups and for a few days of boondocking. We never expect to go several days or weeks without power, so not going overboard in building an elaborate system was important to us. I think this system is a nice balance, giving us flexibility without totally wiping out our maintenance budget.

The other major benefit that we are passionate about is that solar is an environmentally friendly source of electricity. Even though we are at a campground with full service, I am using the solar because I can use a little less of the planet-destroying type of power that is connected to the pedestal at the RV park. We want all of the beautiful scenery we are experiencing to be around for future generations. Solar power is one small way to protect the environment from destruction. The next thing that needs to be made in to a consumer product is an affordable, alternative-powered vehicle that can pull the fifth wheel!

So, if you are considering going through the upgrade, but do not have the money to do all of this, start with Battle Born batteries and an inverter/charger. These will provide you with a much more reliable 12-volt power source. Then, upgrade further to solar when you have more money to invest. The entire set-up is scalable, which gives the flexibility of scaling up everything from the number of batteries to adding solar when it is affordable and makes sense for you travel style and budget. Ending-up with a complete solar system will provide the ability to stay unplugged for extended periods of time and is an environmentally friendly source of power.

Additionally, try and tackle it as a DIY project. You can always pay someone if you get stuck, but I am confident you will get through it. Succeeding provides a great sense of accomplishment and you will end up knowing more about your RV and how it works.

Sharing is Caring! Feel free to share this image on Pinterest! 

Follow this step by step guide for a DIY Rv solar installation. Also includes a power system upgrade with lithium batteries and a new converter & inverter.

Filed Under: Essential RV Gear, Maintenance

1:26 pm by Julie Chickery

Odor Free RV Black Tank Tips

Banish black tank smells forever with these simple steps! Don’t be afraid to use your RV bathroom. Not having to use public restrooms or bathhouses when we travel is one of the reasons we love RV travel.

We’ve been living and traveling full-time in our RV for four years, using our bathroom just as we did in our sticks & bricks home. Even in the sweltering summer heat (we spent a couple in Florida), we were able to keep our bathroom and RV odor free by using the method we’ll outline in this post.

Graphic will text for Roadtrippers Plus

Continue on to read our step by step process or watch the video below.

Step 1. Keep the tanks closed until ready to flush.

If you are at a location with a sewer connection, you may be tempted to keep your camper’s black tank valve open and let the sewage flow freely. Don’t. This will result in the dreaded poop pyramid. Ever use an open pit toilet? You know the ones with no water at the bottom. Everything just starts building up. You need a lot of water to keep things flowing smoothly. In fact, I usually refill the toilet and give it an extra flush after most uses just to keep plenty of water in the tank. This will also help dissolve the toilet paper fully. Bottomline: Water is your friend and keep the tank valve closed until you are ready to dump.

Sales banner with RV outdoor mat, RV GPS, and storage bins.

Step 2. Flush the tank regularly.

It is important to flush your RV black tank regularly. This is easiest when you are at a campground with sewer hookups. We empty our black tank about every 5 – 7 days. If it is not 3/4 full, we add water to assist in completely draining the tank. We also recommend emptying it before travel to reduce the extra weight (water weighs ~8 lbs per gallon).

  • Open the valve and drain the black tank completely.
  • Back flush the camper’s black tank. Our main black tank has the built-in backflush inlet that most newer RVs come with. The black tank for the 2nd bathroom does not, so we purchased a Camco Dual Flush Pro Holding Tank Rinser. We backfill our tank for 4 minutes. Drain and repeat 1-2 times until the water is clear. I used to run inside and watch the tank monitor, but that got old so now I stay outside and time it.
  • Once the water is running clear, close the black tank valve, and backfill the black tank with about 2 gallons of water. Since we have the built-in system, we just time it for 90 seconds. If you don’t have that, you can do it from inside by flushing the toilet and letting the water flow down into the holding tank for that long.
  • We follow a black tank drain and flush cycle with a gray tank flush. We also have two gray tanks — one for the main bathroom (sink/shower) and one for the kitchen and the second shower. If are at a site with sewer hookups, we leave the main one closed until we’re ready to dump the black. We leave the 2nd gray tank open to drain as water is used. If you only have one gray tank and want to leave it open most of the time, we recommend closing it a day or two prior to your black tank flush so you can essentially wash out the sewer hose with the soapy gray water.
  • Finally, when we get back inside the RV, we add two capfuls of Calgon water softener and about 1/2 cup to 1 cup of liquid dish detergent (some people say Dawn, but we use a generic).

Step 3. Remember, Water is Your Friend

As previously mentioned, using plenty of water is the best thing to keep the RV black tanks flowing smoothly. Don’t be afraid to use it. We both often flush an extra time or two just to add water to the holding tank.

Water availability was a problem we encountered with our first boondocking experience. Also, although we were able to use the portable sewage system, we didn’t have enough water available to back flush the tank as we described above. Our solution was to drive to a dump station every other week. If you don’t have a washout at home, you can book-end boondocking or partial hook-up stays with full hook-up campground stays.

Learn our 3 step process for finding the best campgrounds. Whether you are traveling by motorhome, fifth wheel, travel trailer, or campground this process can work for you.

Learn More About Your RV Water Systems

Check out our book, A Complete Novice’s Guide to RV Water System’s Maintenance you want to learn more about your RV water systems, from preventive maintenance like flushing the water heater to sanitizing the freshwater tanks. It’s short, full of photos, and written in laymen’s terms. Even better, it’s free on Amazon Kindle Unlimited!

Sharing is caring! Feel free to share the image below on Pinterest! 

Want an odor free RV? Follow these tips to keeping your camper bathroom smelling fresh! We cover the basics of RV and camper holding tank maintenance. Simple steps, no purchase of deodorizing packets required.

No matter what type of RV you own, you'll need to flush and clean your black tank! Follow our simple GEO method for maintaining odor free holding tanks in your camper. #motorhome #fifthwheel #traveltrailer #camper #sewagetanks #5thwheel #rvtank

Filed Under: Maintenance

  • « Previous Page
  • 1
  • 2
  • 3
  • 4
  • Next Page »
RV technology gear images include TPMS, EMS, and wifi booster
RV LIFE Trip Wizard
Sidebar Text Ad for Rad Power Bike
RV Rentals from Outdoorsy. Images include van, motorhome, and travel trailer.
Image of RV driving towards mountains.

Signup to receive weekly updates and exclusive free content only available to subscribers!

Privacy Policy

Travel Schedule

Recently
Zion National Park, Utah

Currently
Shenandoah National Park, Virginia

Next Stops
Everglades National Park
Biscayne National Park


Notice

We are a participant in the Amazon Services LLC Associates Program, an affiliate advertising program designed to provide a means for us to earn fees by linking to Amazon.com and affiliated sites.

Free RV camping guide with over 30 pages of tips and worksheets

Download Now

Never see this message again.